Create a New Observation Form
Purpose and Benefits
Observation forms (also referred to as templates) are used to capture observations during an encounter in a pre-defined format. One can define observation forms to capture both general/non-disease-specific (e.g. Operation notes) information and condition/disease specific (e.g. Anaemia) information.
To the user, an observation form shows up as an input form in the "Consultation" user interface, while in the back end, the observation form is modeled as a concept set. The form elements can be customized by defining/modifying concepts within the concept set. They can also be customized by adding configuration in implementation-config such as Multiselect, Add more, etc.
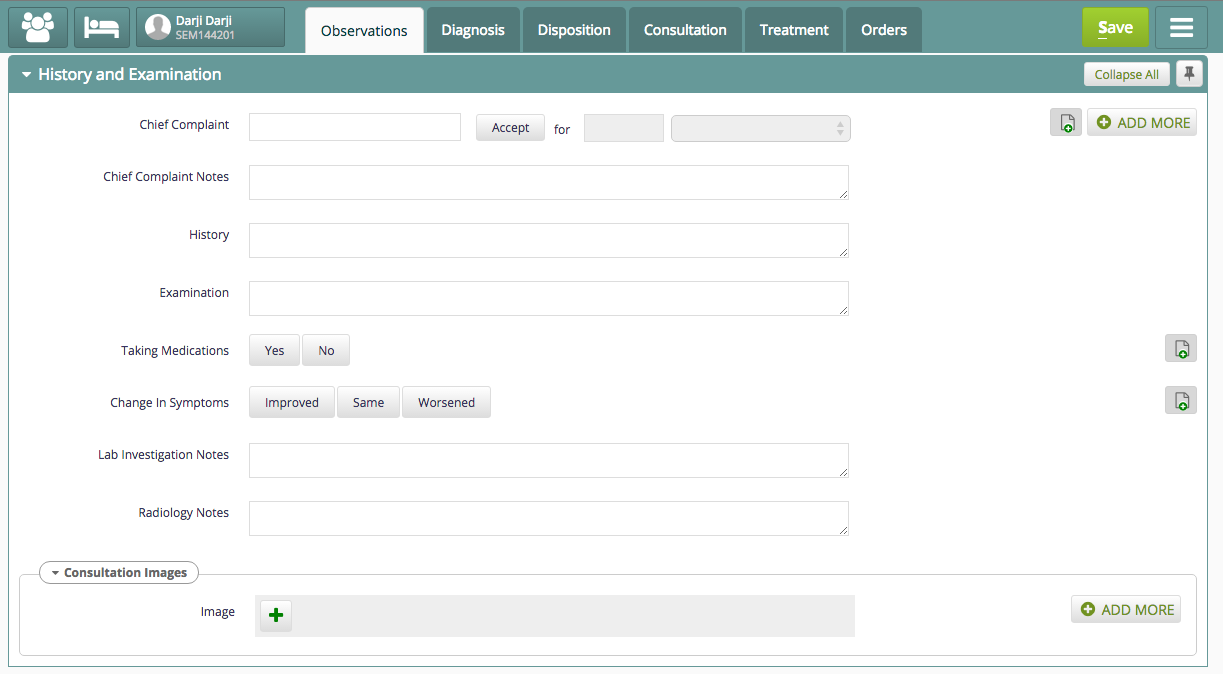
Sample Screenshot of Observation Form
Steps
Add Observation Forms
There are two ways to add Observation Forms to Bahmni:
1. Import Existing Observation Forms to Bahmni
Bahmni supports the ability to import Observation Forms via CSV Upload function in Admin Module. Please refer to the screenshot below:
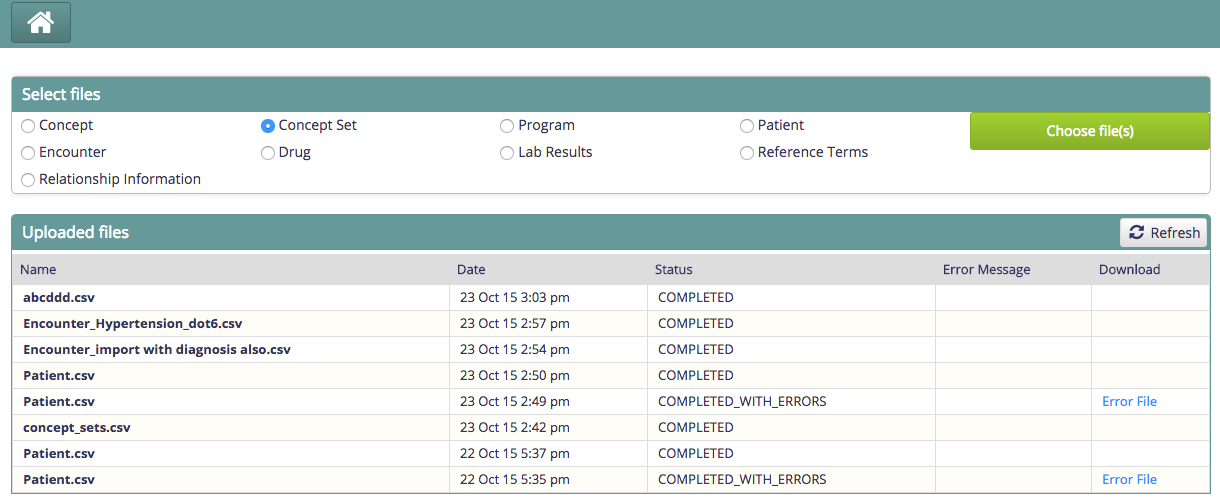
- Create a CSV file of concepts that you would like to show on the New Observation form. Refer to sample concepts.CSV for the formatEach field you wish to see on the screen needs to be a concept."Shortname" of the concept is what is shown on the screen.
- If there is no "shortname" specified then "name" field is used for displaying the label
- To indicate that a Concept is a DropDown or Multi-select, use the DataType "Coded"
- Also specify "name" of the possible answer concepts in the columns answer.1, answer.2 and so on
- Refer to example of "Taking Medications" concept in the Sample concepts.csv below
- Create a CSV file of all conceptSets in your Observation form that you need. Refer to sample concept_sets.CSV for the format
- Child concepts within a concept set needs to be specified in columns child.1, child.2 and so onFor example, the sample concepts_sets.csv has 2 groups as concept sets "Chief Complaint Data" and "Consultation Images"
- check if it is uploaded successfully.
- If there are any errors then download the err file and correct the errors
- check if it is uploaded successfully.
- If there are any errors then download the err file and correct the errors
Sample CSVs:
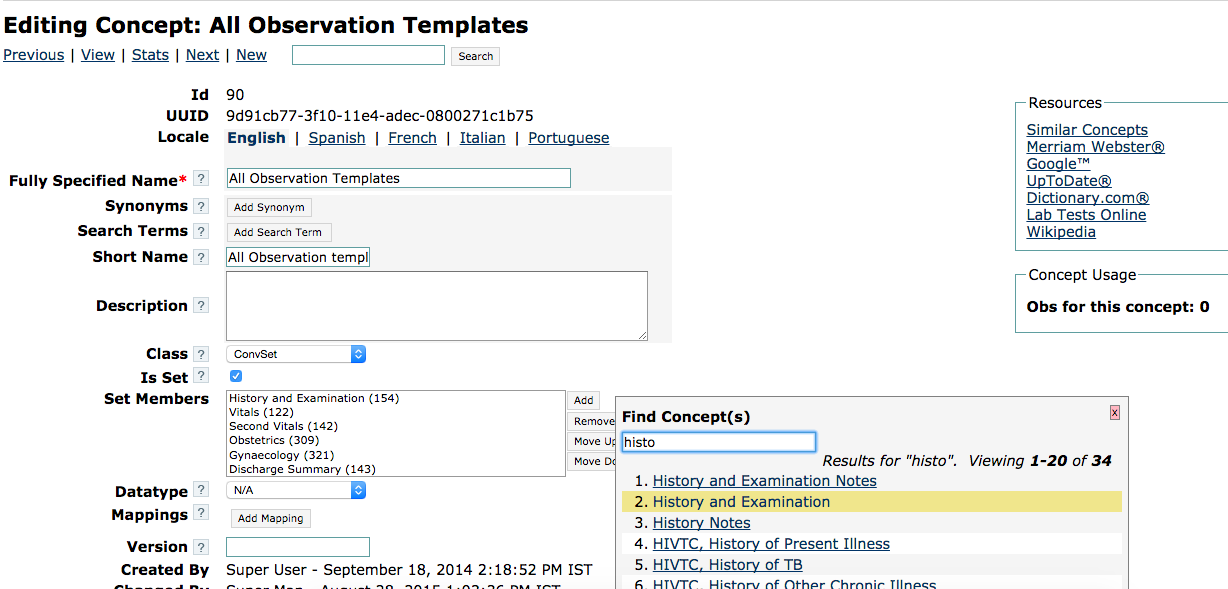
Few CSV examples for Observation Templates and generic concepts can be found at:
2. Configure New/Existing Observation Forms
To configure Disease Template Concept Sets, perform the following step in :
- Concepts usually have a default visualization on the forms UI, but there are some custom configurations that Bahmni allows. Since these cannot be directly added to the concept metadata on OpenMRS, we specify them in the of the clinical module. See the code block below for details:
"visitTypeForRetrospectiveEntries": "GENERAL",
"conceptSetUI": {
		"Consent scan copy" : {
                        "allowAddMore" : true
                },
		"Baseline, List of drugs taken for more than a month": {
                	"multiSelect": true
                },
		"Baseline, Disease site": {
			"multiSelect": true
		        },
		"Baseline, Patients for whom the construction of a regimen with four likely effective second-line drugs is not possible": {
                	"multiSelect": true
                },
        "Baseline, Other patients who have high risk of unfavorable outcome but who do not fit the above categories": {
                	"multiSelect": true
                },
		"Baseline, Method of MDR-TB confirmation" : {
			"multiSelect" : true
		        }
        }
Please refer to https://github.com/Bhamni/endtb-config/blob/master/openmrs/apps/clinical/app.json in case of requirement of additional information.
The table below explains how various Concept Data types work with examples
| | Type | Example |
|---|---|---|
| 1 | Coded - Autocomplete with only coded values Usage: Use it when you have fixed set of answers for a concept | "Death Note, Primary Cause of Death": { "required": true, "answersConceptName": "Death Note, Cause, Answers", "autocomplete": true }Where, "Death Note, Cause, Answers" = Concept which has answers** |
| 2 | Coded - Autocomplete with multi select.This feature is configurable only for the coded concepts and parent of the concept shouldn't be of class "ConceptDetails" type. Default behavior will be button select. | "Fully specified name of the concept": { "autocomplete" : true, "multiSelect" : true }Example :"New Born status": { "autocomplete" : true, "multiSelect" : true } |
| 3 | Coded - Autocomplete with coded values and non-coded values | Using the example of Chief Complaints, here is the OpenMRS concept hierarchy: Chief Complaint Data (Is Set=true, class=Concept Details)Chief Complaint (DataType=Coded)Non-Coded Chief Complaint (DataType=Text)Chief Complaint Answers (DataType=Coded) You can add Chief Complaint data to a concept-set which you are using for your form to show in Observations tabAll the coded answers should be added to Chief Complaint Answers and not Chief Complaint. This is a hack as loading children when loading a concept, slows down the loading of the form."Chief Complaint Data": { "answersConceptName": "Chief Complaint Answers", "autocomplete": true, "codedConceptName": "Chief Complaint", "nonCodedConceptName": "Non-Coded Chief Complaint", "durationRequired": false, "allowAddMore" : true }If either of codedConceptName or nonCodedConceptName is not given, It will be treated as autocomplete with only coded values. The name of this configuration can be either "Chief Complaint Data" or "Chief Complaint" which is the name of <Concept Set> or <Concept Set Member whose DataType is coded>. For multiselect configuration, add the following to the config map. Setting up an Autocomplete field with coded and non coded answers, was formerly known as freeTextAutocomplete"multiSelect": true instead of "autocomplete": true |
| 4 | Coded - Dropdown with only coded values Usage: Use it when you have a smaller set of answers for a concept | "Death Note, Primary Cause of Death": { "required": true, "dropdown": true } |
| 5 | Coded - Button Select with only coded values Usage: Use it when you have a small set of answers for a concept | "Death Note, Primary Cause of Death": { "required": true, "buttonSelect": true } |
| 6 | Text - Free text type | "Chief Complaint Notes": { "conciseText": true } |
| 7 | Boolean - For Yes/No type | "Posture" : { "buttonSelect" : true } |
| 8 | Numeric - For numerical values Usage: Recommended to be configured only when the numbers would be small like number of children, pregnancies etc | "No of children" : { "stepper": true } |
| 9 | Date - For dates (without time) | |
| 10 | Datetime - For dates with time | |
| 11 | N/A - No data type Usage: This is used for concepts which are used as answer to some other concept | |
| 12 | answersConceptName | It is an optional field. If it is not configured, then the same concept's answers will be picked. Example: "Death Note, Primary Cause of Death": { "required": true, "autocomplete": true }Where, "Death Note, Primary Cause of Death" = Concept which has answers |
Capturing Video as observation in Bahmni
Steps:
- Create a concept in OpenMRS Concept Dictionary with Class as 'Video', datatype as 'Complex' and handler as 'VideoUrlHandler'.
- Include the concept in the observation template in which it should be part of.
- In the observation template, for the video concept there will be a '+' button. On click of that button the files will be opened.
- Select the video and save.
Notes:
- Only mp4, ogg and webm formats are supported for viewing of video. If other formats are uploaded, it will not be viewable in the browser, you can only download it.
- The file size should be under 50mb (above that the browser might crash) while uploading.
Concept Data Conditions
Any concept in the parent concept set can be enabled / disabled conditionally based on the other concepts value. This makes the long forms usable and intuitive to use.
In the example below, "Chief Complaint Notes" is editable only if "Chief Complaint" concept is filled:
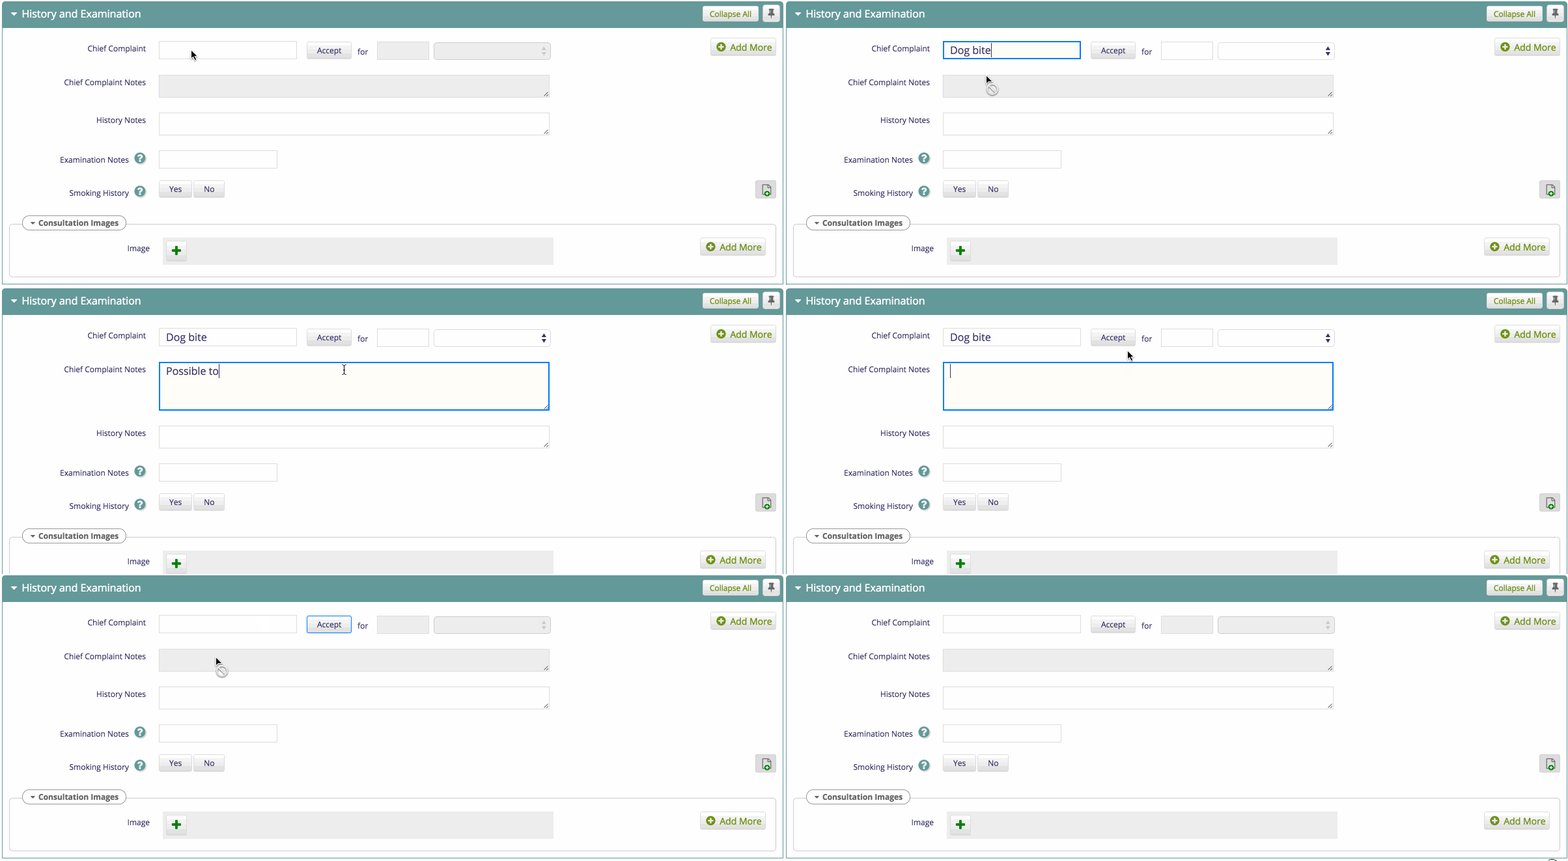
Conditionally enable/disable Concepts
The configuration to conditionally enabling/ disabling concepts based on value of other concepts (as shown in the image) is shown below (formConditions.js):
// Bahmni.ConceptSet.FormConditions.rules is a map with key as the <concept name> that matches with the currently changed element in the observation form
Bahmni.ConceptSet.FormConditions.rules = {
  '<concept name>': function(formName, formFieldValues) {
        // This function gets 2 parameters
        // 'formName' will be the concept name of the form in which a value has been changed. ("History and Examination" in the above gif)
        // 'formFieldValues' is a map with key as concept name and value as its current value
        //    All the editable fields like 'Chief Complaint', 'Chief Complaint Notes', 'History Notes' will be present with their values as seen on the screen

        return {enable: [], disable: []};
        // This method SHOULD return a map with two keys 'enable' and 'disable' with string array containing the concept names that needs to be enabled or disabled
  }
Example:
Bahmni.ConceptSet.FormConditions.rules = {      //This is a constant that Bahmni expects
  'Chief Complaint Data': function(formName, formFieldValues) {//'Chief Complaint Data' concept when edited, triggers this function
        var conditions = {enable: [], disable: []};
        var chiefComplaint = formFieldValues['Chief Complaint'];
        var nonCodedChiefComplaint = formFieldValues['Non-Coded Chief Complaint'];
        if(chiefComplaint || nonCodedChiefComplaint) {
            conditions.enable.push("Chief Complaint Notes")
        } else {
            conditions.disable.push("Chief Complaint Notes")
        }
        return conditions; //Return object SHOULD be a map with 'enable' and 'disable' arrays having the concept names
  }
};
Enable or disable form elements based on multi-select
Bahmni.ConceptSet.FormConditions.rules = {
  'Tuberculosis, Type': function(formName, formFieldValues) {
    var conditions = {enable: [], disable: []};
    var selectedValues = formFieldValues['Tuberculosis, Type'];
    var found = _.contains(selectedValues, "Pulmonary") && _.contains(selectedValues, "Extrapulmonary")
    if(found) {
        //conditions
    } else {
        //conditions
    }
  }
};
Conditionally Show/Hide Concepts
When large amount of information is captured, the forms grow in size, the user would need to do significant amount of scrolling to get to relevant fields where data is to be entered. By using the config as below it is possible to show/hide fields in the form based on form conditions.
- One can configure show/hide and enable/disable conditional observation forms at the same time for different concepts.
- You may have a look at this file here for reference: https://github.com/Bhamni/default-config/blob/master/openmrs/apps/clinical/formConditions.js
The configuration to conditionally show/ hide concepts based on value of other concepts is shown below (formConditions.js):
'<Concept Name>': function (formName, formFieldValues) {
        // This function gets 2 parameters
        // 'formName' will be the concept name of the form in which a value has been changed. ("History and Examination" in the above gif)
        // 'formFieldValues' is a map with key as concept name and value as its current value
        //  All the editable fields like 'Chief Complaint', 'Chief Complaint Notes', 'History Notes' will be present with their values as seen on the screen

        return {show: [], hide: []};
        // This method SHOULD return a map with two keys 'show' and 'hide' with string array containing the concept names that needs to be enabled or disabled
}Bahmni.ConceptSet.FormConditions.rules = { //This is a constant that Bahmni expects
'Chief Complaint Data': function(formName, formFieldValues) {//'Chief Complaint Data' concept when edited, triggers this function
var conditions = {show: [], hide: []};
var chiefComplaint = formFieldValues['Chief Complaint Data'];
var nonCodedChiefComplaint = formFieldValues['Non-Coded Chief Complaint'];
if(chiefComplaint || nonCodedChiefComplaint) {
conditions.show.push("Chief Complaint Notes")
} else {
conditions.hide.push("Chief Complaint Notes")
}
return conditions; //Return object SHOULD be a map with 'show' and 'hide' arrays having the concept names
}
};Configure date control to display month and year
When “displayMonthAndYear” is set to true for a concept of type ‘date', the concept allows user to select month and year in dropdown. The years between minYear and and maxYear are shown in the dropdown. By default, the date will be set to first of the month. When minYear is not configured, default minYear is 15 years from current year. When maxYear is not configured, default maxYear is 5 years from current year by default. When “displayMonthAndYear” is set to false or not configured, date will be the default date picker.
"config" : {
"conceptSetUI": {
"Malaria, Treatment Start Date" : {
    "minYear": 1999,
    "maxYear": 2019,
    "allowFutureDates": true,
    "displayMonthAndYear": true
		}
	}
}
Configure "Add more" button
"Add more" button allows the user to fill multiple instances of the same form in one go. This is achieved by clicking on the "Add more" button at the top right corner of the form.
"config" : {
   "conceptSetUI": {
       "Adverse Events Template": {
          "allowAddMore": true
       }
   }
}
Configure Tabular view
It is used to view the observation page in tabular view
"config" : {
   "conceptSetUI": {
       "Adverse Events": {
          "isTabular": true
       }
   }
}하위 문서
Bahmni Wiki · CC BY-SA 4.0